The OMT Pelvic and Sacral Somatic Dysfunction section provides High Yield information needed for the COMLEX Level 1, 2, and 3 during Medical School and Residency. Learn how to diagnose and use different types of osteopathic manipulative treatment for Pelvic and Sacral Somatic Dysfunction.
Pelvic Somatic Dysfunction Chart
Right Side Pelvic SD
| Right Side SD | Standing Flexion Test | ASIS | PSIS | Pubic Tubercle |
| R Anteriorly Rotated Innominate | R Positive | R Inferior | R Superior | |
| R Posteriorly Rotated Innominate | R Positive | R Superior | R Inferior | |
| R Superiorly Sheared Innominate | R Positive | R Superior | R Superior | |
| R Inferiorly Sheared Innominate | R Positive | R Inferior | R Inferior | |
| R Innominate Inflare | R Positive | R Medial | R Lateral | |
| R Innominate Outflare | R Positive | R Lateral | R Medial | |
| R Superior Pubic Shear | R Positive | Symmetrical | Symmetrical | R Superior |
| R Inferior Pubic Shear | R Positive | Symmetrical | Symmetrical | R Inferior |
Left Side Pelvic SD
| Left Side SD | Standing Flexion Test | ASIS | PSIS | Pubic Tubercle |
| L Anteriorly Rotated Innominate | L Positive | L Inferior | L Superior | |
| L Posteriorly Rotated Innominate | L Positive | L Superior | L Inferior | |
| L Superiorly Sheared Innominate | L Positive | L Superior | L Superior | |
| L Inferiorly Sheared Innominate | L Positive | L Inferior | L Inferior | |
| L Innominate Inflare | L Positive | L Medial | L Lateral | |
| L Innominate Outflare | L Positive | L Lateral | L Medial | |
| L Superior Pubic Shear | L Positive | Symmetrical | Symmetrical | L Superior |
| L Inferior Pubic Shear | L Positive | Symmetrical | Symmetrical | L Inferior |
Pelvic Somatic Dysfunction
Anterior Rotated Innominate
- Diagnosis:
- MET Treatment:
- 1. Passively flex and slightly ABduct the patient’s hip while flexing the knee on the side of dysfunction
- 2. Position the knee near your shoulder and stabilize with a hand
- 3. Place your other and under the hip at the ischial tuberosity
- 4. Tell the patient to extend their hip by pushing their knee against your shoulder
- 5. During relaxation, push their hip into further flexion while pulling inferiorly on the ischial tuberosity to encourage posterior rotation
- 6. Repeat 3-5x
- HVLA Treatment:
Posterior Rotated Innominate
- Diagnosis:
- MET Treatment:
- 1. Tell the patient to slide over so the dysfunctional innominate is off the table and their hip is extended
- 2. Use one of your legs to prop up and stabilize the extended leg
- 3. Stabilize the opposite ASIS with one hand and place your other hand superior to the patient’s extended knee
- 4. Tell the patient to flex their hip by lifting the leg towards the ceiling while you resist
- HVLA Treatment:
Superiorly Sheared Innominate
- Presentation:
- Diagnosis:
- MET Treatment:
- 1. Have the patient slide toward the end of the table so the ankles are hanging off
- 2. Grasp the tibia and fibula superior to the ankle on the side of dysfunction
- 3. Place the plantar surface of the opposite foot on your quads to stabilize
- 4. Lose pack the dysfunctional hip by adducting and abducting until you find the position of greatest ease
- 5. Internally rotate the leg and hip to lock the hip joint
- 6. Have the patient breathe while you lean back and apply traction by pulling the leg with each breath
- 7. Have patient cough and simultaneously apply a thrust to the leg
- HVLA Treatment:
Innominate Inflare MET
- Set up:
- Stand on opposite side of the inflare
- Flex the knee and hip, and place the foot on the table close to the buttocks
- Hold the opposite ASIS and laterally abduct the hip
- Activation:
- Have the patient adduct the knee
Innominate Outflare MET
- Set up:
- Have patient flex both knees with feet flat on the table
- Alternate having the patient abduct and adduct against resistance
- Optional quick, lateral thrust during final round of adduction
- Activation:
- Have the patient abduct the knee
Sacral Somatic Dysfunction

| Bilateral Flexion | Bilateral Extension | |
| Seated Flexion Test | Even | Even |
| Sacral Base | Both sacral base deep | Both sacral base shallow |
| ILA | Both ILA shallow | Both ILA deep |
| Spring Test | Springing on both bases | NO Springing on both bases |
| Draw |    |    |
| R Unilateral Flexion | R Unilateral Extension | L Unilateral Flexion | L Unilateral Extension | |
| Seated Flexion Test | R + | R + | L + | L + |
| Sacral Base | R deep | R shallow | L deep | L shallow |
| ILA | R shallow | R deep | L shallow | L deep |
| Spring Test | Springing on R base | NO Springing on R base | Springing on L base | NO Springing on L base |
| Draw |    |    |    |    |
| R on R Torsion (Forward) | L on R Torsion (Backward) | R on L Torsion (Backward) | L on L Torsion (Forward) | |
| Seated Flexion Test | L + | L + | R + | R + |
| Sacral Base | R deep | L deep | R deep | L deep |
| ILA | R deep | L deep | R deep | L deep |
| Spring Test | Neg. (spring) | Pos. (no spring) | Pos.(no spring) | Neg. (spring) |
| Sphinx | Even | Un-Even | Un-Even | Even |
| L5 Rotation | Left | Right | Left | Right |
| Draw |   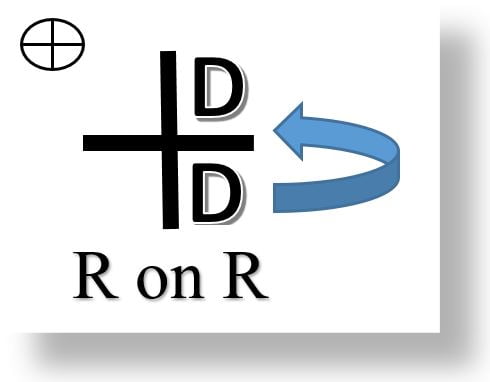 |   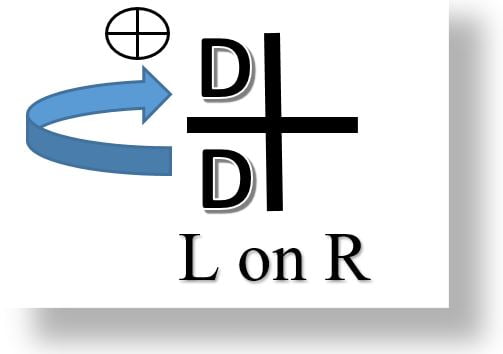 |   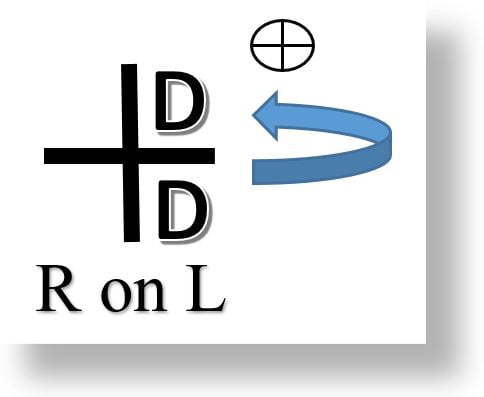 |   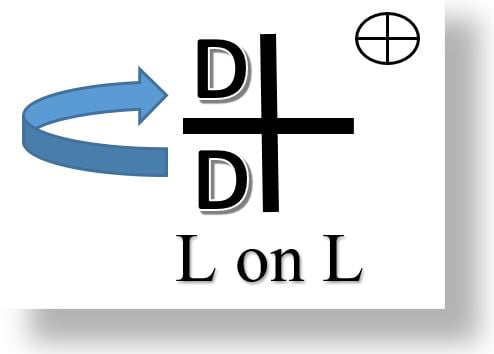 |
Sacral SD Treatments
Unilateral Sacral Flexion MET
Treatment Example: Left unilateral sacral flexion
1. The patient is prone; the physician stands at the right side of the patient.
2. The physician’s left fingertips palpate in the left sacral sulcus to monitor SI motion.
3. The physician abducts the patient’s left leg to maximum “gapping freedom” at sacral sulcus and internally rotates the hip.
4. The physician then places heel of caudad hand on the patient’s left ILA, keeping his/her elbow straight. The caudad hand is reinforced by the cephalad hand.
5. Exert sustained force downward on the left ILA
6. The patient is instructed to inhale maximally and hold breath for 5-10 seconds as the physician maintains pressure on the ILA.
7. As the patient exhales slowly, the physician maintains pressure.
8. Repeat two or more times as needed. Return leg to midline.
9. Re-evaluate diagnostic criteria.
Unilateral Sacral Extension MET
Treatment Example: left unilateral sacral extension
1. The patient is prone.
2. The physician stands at the right side of the patient.
3. The physician’s right hand palpates the left sacral sulcus to monitor SI motion.
4. The physician abducts the patient’s left leg to maximum “gapping freedom” at sacral sulcus and internally rotates the hip.
5. The physician places heel of hand on patient’s left sacral base, reinforcing with other hand on top.
6. The patient is instructed to inhale slightly and then exhale maximally.
7. As the patient exhales, the operator applies pressure to the left sacral base in an anterior and caudad direction and holds this position for 5-10 seconds.
8. Repeat steps 6 and 7 two or more times as needed.
9. Return leg to midline.
10. Re-evaluate diagnostic criteria.
Bilateral Sacral Flexion MET
1. The patient is seated on a stool with knees and feet apart. The patient forward bends with the arms between the knees until the examiner feels motion at the sacroiliac joints.
2. The physician places the heel of one hand below middle transverse axis of the sacrum. The physician then places the other hand on the mid to lower thoracic area, in the midline.
3. Physician puts pressure on the sacrum below MTA in an anterior direction, thus causing the sacral base to move posteriorly (extend) to the motion barrier.
4. The physician then instructs patient to push back, trying to sit up, while physician offers isometric counterforce for 3-5 seconds
5. After 3 to 5 seconds the patient relaxes, and the physician flexes the lumbosacral joint to new restrictive barrier by applying pressure to the sacrum below the MTA (sacral extension).
6. Steps 4 and 5 are repeated two or more times as needed.
7. Re-evaluate diagnostic criteria.
Bilateral Sacral Extension MET
1. The patient is seated on a stool with knees and feet apart. The patient extends the lumbar spine until the examiner feels motion at the sacroiliac joints.
2. The physician places the heel of one hand on the sacral base above the middle transverse axis of the sacrum. The physician’s other hand is placed on the sternum or the forearm is placed across the upper rib cage
3. Physician puts pressure on the sacrum above the MTA in an anterior direction, thus causing the sacral base to move anteriorly (flex) to the motion barrier.
4. The physician then instructs patient to push forward while physician offers isometric counterforce for 3-5 seconds
5. After 3 to 5 seconds the patient relaxes, and the physician extends the lumbosacral joint to new restrictive barrier by applying pressure to the sacrum above the MTA (sacral flexion).
6. Steps 4 and 5 are repeated two or more times as needed.
7. Re-evaluate diagnostic criteria.
Forward Sacral Torsion MET
1. The patient lies on the side of the deeper sacral sulcus (i.e. right side for a left on left torsion) in a lateral recumbent position.
2. Grasp just above patient’s ankles with one hand while palpating the lumbosacral junction with the other. The hips are flexed until motion is palpated at the lumbosacral junction.
3. Switch monitoring hands. Using respiratory cooperation if needed, rotate the patient’s shoulders back toward the table with cephalad hand until rotational motion is engaged at the lumbosacral junction.
4. Switch monitoring hands again. By lifting the ankles with caudad hand, raise the patient’s feet toward the ceiling until restricted movement is palpated at the lumbosacral junction.
5. The patient is asked to push the feet back down toward the table surface while the physician resists isometrically for 3-5 seconds.
6. Repeat steps 4&5 two or more times as needed, taking up slack following each contraction. Take one last time into barrier passively, then return legs to neutral.
7. Recheck diagnostic criteria.
Backward Sacral Torsion MET
1. Patient lies in lateral recumbent on side of the deeper sacral sulcus (i.e. for a left on right torsion, put patient on right side) with hip and knee of top leg flexed, and lower leg extended.
2. The physician stands facing patient, palpating lumbosacral junction with cephalad hand. Using caudad hand, the physician flexes the upper hip (left hip) until motion is palpated at the lumbosacral junction.
3. Now, the physician switches monitoring hands and uses his cephalad hand to grasp the patient’s ipsilateral elbow. Gently pulling the patient’s elbow, the physician rotates the patient to lay his torso supine until motion is palpated at the lumbosacral junction.
4. Grasp the patient’s top leg just above the ankle, maintaining hip flexion. Abduct the calf of the top leg, lifting the patient’s ankle upward (inducing lumbar sidebending) to point that physician palpate restricted motion at lumbosacral junction.
5. Ask the patient to push ankle down toward their other ankle (toward midline, not inferiorly) while physician resists isometrically for 3-5 seconds. Pause 1-2 seconds for complete relaxation. Variation: Position patient in left lateral Simms, deep sulcus up. Adduct top leg’s calf to point you palpate restricted motion at lumbosacral junction. Ask the patient to push the knee towards the ceiling while physician resist isometrically.
6. Repeat steps 4&5 two or more times, taking up slack following each contraction.
7. Passively move patient one final time into the barrier. Then, return to neutral.
8. Recheck diagnostic criteria.